
Paver Sealing: The Essential E-Book
Paver sealing is a popular choice for people who’ve invested in a paver driveway or patio. Before you dive in, take a moment to learn a little bit about paver sealing, how paver sealers can protect your driveway/patio, and the benefits involved.
Our exclusive paver sealer e-book has all the information you need to make an informed decision.
Simply click the button below to download your free PDF or read on below!
![]()
What is Paver Sealing?
Before defining paver sealing, it’s important to understand what a paver is. Most often, it’s a type of driveway, but it’s also used on:
- patios
- walkways
- pool decks
- retaining walls
- and other hardscapes
Paver driveways are very common in the US, especially in the South. In fact, when compared to asphalt, concrete, and gravel, paver driveways are the easiest to maintain. So while installation cost is typically higher than the other types, taking care of your paver driveway is much cheaper than caring for other types.
In the end, when you choose a paver driveway, you’re essentially trading the long-term ongoing maintenance costs over the lifetime of an asphalt/concrete/gravel driveway for the up-front installation cost of a paver. It’s definitely much better to install the best, high quality option initially at a higher price, and then save tons of money over years in the long run, as maintenance costs can truly add up!
When properly maintained, a paver driveway can last for 30-40 years!
A paver driveway comes in one of several different types:
- Brick pavers
- Interlocking pavers
- Concrete pavers
- Permeable pavers
No matter what you call them, when it comes to looks and installation, those first 3 types are all pretty much the same – but they are not manufactured in the same way!
Paver sealing protects your paver surfaces.
Brick pavers are baked at very high temperatures, while concrete/interlocking pavers are formed and dried in a setting that’s climate-controlled. All of these provide a solid surface that sheds water efficiently.
Permeable pavers, however, let water penetrate into the soil, or sub-grade, beneath the pavers. This allows much less water runoff and is generally better for the environment.
Since your driveway is exposed to the elements, it needs protection. Paver sealing is simply a way to protect your paver driveway once installed.
The Dangers of Not Sealing Your Paver
- You’ll Have to Clean It More Often – If you don’t seal your paver, you will have to clean it more often. The stains will be harder – and sometimes even impossible – to remove. It’s best to simply protect your investment and save time with paver sealing.
- More Weeds to Pull – You’ll have to pull weeds more often, as they’ll grow in the joints of your paver. A common misconception is that these weeds come from beneath the pavers and grow through the joint. This is false, though. The truth is that weeds almost always come from blown-in seeds that are deposited into the sand joint from neighboring weeds. Have a lot of weeds in your yard? This is pretty much a guarantee that you’ll have weeds in your paver joints. Get them sealed to free yourself from the annoyance of having to pull weeds. Specifically, a joint stabilizing sealer will help prevent this growth.
- Sinking Spots and Shifting – Not sealing can also lead to sinking spots and shifting – sort of. This is actually caused by sand loss in your joints. The sand in the joint spaces out each paver, but when that sand is lost, there are gaps. Those gaps allow unnecessary movement. A joint stabilizing sealer, on the other hand, will prevent this problem by protecting your paver from sand loss.
 How does it work?
Note: Do not apply sealer over efflorescence. This will only seal it to the paver, and you’ll have to strip the entire sealant and start over.
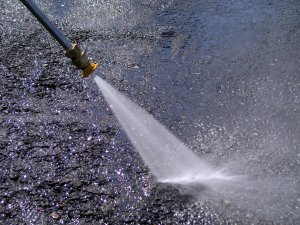
The first step is to pressure wash your paver. Contact a reputable pressure washing Tampa company, like Peter’s Pressure Washing, to make sure the job’s done right. Then, wait for moisture to dry for at least 48 hours.
Then, sweep and clean your paver. Make sure the sand is at least 1/8 inch below the paver surface. Ensure any residue, powder, and sand is removed with a broom and blower. A leaf blower is recommended for this step.
Third, you’ll pull weeds in the joints before getting started with sealing. For best results, the sand should be dry to its full depth before sealing.
Don’t apply sealant during bad weather or in direct sunlight in temperatures over 90° F.
If your paver was just installed, we recommend waiting 15-30 days for it to “cure” before applying a paver sealer. During this time, the pavers must be “hydrated” multiple times. This can be done by rain or by hosing them down. The whole purpose of this is in case there are going to be an efflorescence issues, we want them to show themselves before we seal the bricks.
It is the process of the pavers absorbing water and then drying that causes the dormant minerals inside the manufactured paver to come to the surface as efflorescence. If after two weeks of hosing down and letting the pavers dry, there are no visible signs of efflorescence, then it’s not necessary to wait any longer and the pavers should be sealed.
Finally, wait 24 hours after application before walking or driving onto the newly sealed paver.
To Maintain: Clean your paver regularly with heavy duty cleaner, then rinse well with water.
 When should I get paver sealing?
As described above, you should wait 15-30 days after paver installation to apply a paver sealer. We recommend waiting no longer than 30 days before sealing the pavers, because otherwise, they will fade and have surface erosion from being left out in the elements for too long.
However, you can do this at other times, as well, if you prefer. Paver sealers can restore old paver surfaces to look gorgeous and brand new.
We also offer translucent tint to restore pavers that are excessively faded and need rejuvenation.
This process involves a tint or stain being applied in conjunction with the sealing.
This process involves a tint or stain being applied in conjunction with the sealing.
If you’re wondering if now is the best time for a paver sealer, take a moment to look at your driveway, patio, walkway, or other paver surface. Do you see aging or deterioration? If so, it’s time for a paver sealer.
Other tell-tale signs it’s time for paver sealing include:
- Large amount of weeds
- Heaving issues
- Oil spots
- Fading
- Mildew
- Shifting or loose pieces
When do I need to refresh my paver sealer?
We recommend resealing your pavers 3 years after the initial sealing, and then every 5 years thereafter.
Make sure you use the same paver sealer that was applied to your paver originally. Do not deviate!
This is important because different sealers are made using different formulas. A chemical reaction may occur if two types of sealers come in contact with one another. This leads to a cloudy, white appearance.
If you don’t remember the original sealer used, test the new sealer first on a small area of your paver. Or you can strip the original sealer before applying a new coat.
It’s not recommended to use coating sealers on or around pool decks, since they might make pavers slippery and dangerous when wet.
 Benefits of Paver Sealers
Paver sealing has tons of great benefits. When you are looking for pressure washing in Tampa, check out paver sealers, too. Some pressure washing companies, like Peter’s Pressure Washing, can do both! Two birds with one stone. That saves you time and money.
Other benefits of paver sealing include:
- Prevents weed and grass growth in joints
- Reduces moss growth
- Deters ants and other insects
- Prevents loss of sand in joints
- Protects against salt damage
- Makes cleaning easier
- Repels oils, grease, grime, and stains
- Enhances color, brightness, and texture
- Resists effects of harsh weather
- Decreases surface wear and deterioration
- Reduces possibility of cracks and paver loosening
- Long-lasting and beautiful
- Great value that saves you money in the long run
Choosing the Right Paver Sealer
When choosing a paver sealer, consider the type of look you want. There’s a ton of choices, depending on what you’re looking for.
Warning! Avoid “Wet Look” solvent-based acrylic sealers. Why? Because these are not meant for pavers; they are simply acrylic concrete sealers remarketed as paver sealers.
We do not use any acrylic sealers due to their low quality.
While this product will definitely make your driveway look wet and shiny once applied, it’s a guaranteed recipe for disaster. In fact, we strip these acrylic sealers all the time – they don’t last and they turn white quickly.
Pavers are designed to be porous, and moisture is a big issue for them. Solvent-based acrylics, on the other hand, are not designed to withstand these high levels of moisture and will fail, turning an ugly milky white and ruining your paver.
In the end, Peter’s Pressure Washing likes to use water-based (water-reducible) urethane sealers like ICT UreSeal H20. ICT offers a few different sealers we use. Some are penetrating and meant for natural stone. This UreSeal can give you that gorgeous “wet look” WITHOUT the damaging effects of an acrylic sealer.
Remember, you get what you pay for. A cheap sealer will not last as long or offer the same benefits as a high-quality sealer. In addition, you’ll have to apply it more frequently and it may lead to discoloration, especially if you switch to a better sealer later on. Comparison shop, definitely, but don’t just go for the lowest price tag; it’s often the lowest quality and won’t give you the best results.
UreSeal H2O can give you that gorgeous “wet look” WITHOUT the damaging effects of an acrylic sealer.
Types of Paver Sealers
- Spray Application vs Roll to Seal – Roller application doesn’t work as well on pavers as it does on concrete. The roller often picks up joint sand and rolls it over the top surface.
- Water-Based Sealer vs Solvent-Based – Most manufacturers prefer water-based sealers, as solvent-based are hard on the environment. In addition, solvent-based sealers don’t seal joint sand as well as water-based sealers. Water-based sealers soak down deeper into the sand. Solvent-based sealers can create a nice glossy finish, but can also make the surface slippery if applied too thick. Plus, the gloss usually burns off from sun exposure after about 6 months. Stick with water-based.
- Polyurethane vs Acrylic – Polyurethanes (water-based) are UV resistant and more chemically resistant than acrylics. They also don’t yellow, perform better outside, and are more resistant to chemicals like brake fluid, oil, and chlorine. The best water-based polyurethanes are made up of 2 parts that require mixing. When mixed together, they cross link to create an extremely durable, long-lasting paver sealer – even when exposed to sunlight or harsh temperatures. Plus, they are not as sensitive to moisture – after pressure washing, you can apply this in the same day! The only downside is that you have to use them the same day they’re mixed, and they tend to cost more than acrylics. But with all these benefits, they’re the clear choice. Acrylics tend to blush (turn white) with trapped moisture, which is a very difficult problem to fix. You have to strip off the entire sealer and start over – what a pain! Save yourself the trouble and choose polyurethane.
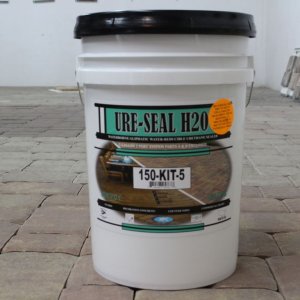 Our Favorite Sealer: Ure-Seal H2O
Ure-Seal H2O is a “wet-look” sealer and not a “high gloss” sealer. What does this mean? It’s the difference between color enhancement and shine (which is essentially light refraction).
With Ure-Seal H2O, we are able to achieve excellent color enhancement and a light shine. We have found the majority of our customers prefer this wet-look color enhancement over shine since it brings out the beauty of the stone. Plus, high gloss products can actually have a distracting effect on your naturally beautiful travertine.
Sand Joints and Joint Stabilization
According to the ICPA (Interlocking Concrete Paver Association) a proper joint sand level is 1/8th of an inch below the chamfer edge (beveled edge) of the paver. This is our target joint sand level, but since sanding joints requires hand eye coordination, there will be some variance in the exact sand level.
In some places the sand will be closer to 1/4” below, while in other places it may be close to flush. Please remember that this is all acceptable and will not have any detrimental effect on the travertine installation or the performance of the sealer.
Ure-Seal H2O eliminates the need for polymeric sand.
Ure-Seal H2O eliminates the need for polymeric sand. Through the first application of the sealer, which is called the “flood coat,” the freshly sanded joints are flooded with Ure-Seal H2O, which contains hardening agents. This creates a bond between the particles of sand and locks the joint in. This helps inhibit weed growth, algae growth, and ant mines.
Please do not confuse “inhibits” with “prevents.” There is no product on the market that can single-handedly prevent these things completely. Ure-Seal H2O is one very important part of a solution to these problems, but there are also many variables involved.
In most cases, other forms of preventative maintenance should also be utilized, such as:
- treating your lawn for weeds and bugs
- an annual maintenance cleaning and mildicide treatment on your pavers
Thankfully, we offer all these things!
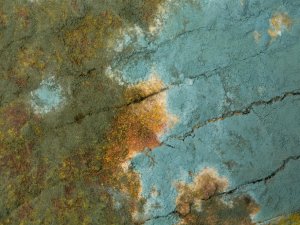 Mold and Algae Growth
This is one of the main reasons people choose to seal their pavers. Any unsealed stone surface will rapidly grow algae, mold, and mildew. This is not only unsightly, but it can also parasitically eat away at the paver itself if left untreated. These organic growths have root systems that feed off the minerals found in the materials and pigments in the concrete matrix of the brick paver. Sealing your pavers with Ure-Seal H2O will inhibit the growth of algae, mold, and mildew.
Keep in mind that while Ure-Seal H2O makes it much more difficult for algae to grow, it does not make it impossible. This is why we strongly encourage bringing us back to do an annual maintenance clean and mildicide treatment. Sometimes this can be necessary more than once per year depending on the drainage situation, exposure to sunlight, proximity to trees, etc. Because of these variables, the growth of algae, mold, and mildew is not a warranty item.
Fading
Pavers will fade drastically from the sun’s UV rays when left unsealed. Although it’s usually never too late to seal, the best time to seal is 30 days after the pavers have been installed. Sealing your pavers with Ure-Seal H2O will preserve the color of the stone and prevent – yes, that’s right – prevent fading.
However, just because the paver will not fade does not mean the sealer will not fade and wear away. Ure-Seal H2O does not fade quickly, but – just like anything – it does fade over time.
To put this in perspective, what we can say is that we have visited jobs that we have sealed 3-4 years ago to re-seal them and the pavers still have a significant “wet-look” and are much more enhanced than they were before they were sealed. But needless to say, they faded some compared to when they were first sealed.
There is no way to predict the exact rate at which the sealer’s enhancement will lighten since it depends on variables such as rain, sun, traffic, and maintenance.
 Slip Resistance and Traction
One of Ure-Seal H2O’s unique benefits over many other sealers is that it does not create a slippery surface on pavers.
Since it is designed with high quality resins it both penetrates into the paver’s concrete matrix and creates a thin topical layer of protection.
The pavers, however, will retain their original traction and profile resulting in little to no change in traction after Ure-Seal H2O is applied.
Movement, Sinking, and Settling
A common misconception is that the sand joints have anything to do with this issue.
While the sand joints are important, they have little to no effect on paver movement. In fact, failure in the compacted base underneath is the most common reason why settling occurs.
This could happen either because of installer error or natural causes such as:
- settling of the earth underneath the base
- decomposing tree stump/roots
- a broken pipe causing washout
- or some other reason
The most common area we see movement on paver installations is around the edges of the installation. This is usually because the install company did not do a good enough footer to hold in the edges of the installation and so the stone starts “floating” away.
Our Warranties
The most important thing that could be warrantied on any paver or travertine sealing job is the bond of the sealer to the stone/brick. If this bond fails, then a whiting issue will occur as the sealer delaminates. This is where our “Whiting Issue Warranty” comes in. Every sealing job we complete comes with a Whiting Issue Warranty. We are so confident in the Ure-Seal H2O product AND our ability to install it correctly that we guarantee that the sealer will never turn white or delaminate.
We guarantee that the sealer will never turn white or delaminate.
In addition to offering this warranty, we are one of the few companies in the Tampa area that even possesses the vacuum recovery equipment needed to strip a failing sealer and fix a whiting issue. So not only do we offer this warranty but we actually have the ability to carry it out. That being said, since we started using water-based urethane sealers in 2012, we have never had even one whiting issue with the Ure-Seal H2O, and our customers have never had to use the warranty.
When you choose Peter’s Pressure Washing you can have the confidence that you will never find yourself in a sealer whiting issue predicament, but if you do, you will incur no cost to have it resolved. Please note that we can only offer this warranty when the travertine has not been sealed before. If the stone has been sealed but shows no signs of whiting/failure and the customer opts to seal over the original coating which was not done by us, then we cannot offer the Whiting Issue Warranty. This is because we do not know if the previous company prepped and installed the original sealer correctly, even if it was Ure-Seal H2O. However, if we strip off the original sealer before resealing, then the customer would receive the Whiting Issue Warranty.
We also have a “Rain Warranty.” This is the second most important warranty we could offer you. This warranty ensures you that if the sealer gets rained on before it has achieved water repellency, then we will re-seal the job at no cost to you. Usually the sealer is ready for rain within 1-2 hours, and unlike most other sealers it has never turned white on us because it got rained on, it simply dilutes the sealer off since it is a water based sealer.
Our warranty does not cover algae, mold, and mildew growth. It does not cover weed growth in the joints. It does not cover washout of sand from the sand joints. It does not cover the rate at which the enhancement of the sealer fades. It does not cover movement of the pavers from sinking, settling, tree roots, broken/insufficient footer, etc.
Efflorescence
Efflorescence is what happens when moisture breaths out of the paver/stone and with it carries minerals, primarily calcium and salt, to the surface. The water evaporates but the minerals are left behind as a residue on the surface. This residue is usually powdery but can become calcified and extremely difficult to remove. In some cases, efflorescence cannot be completely removed without damaging the paver.
We recommend waiting 30 days after the pavers go into the ground before sealing them. It is also important that during this time the pavers are being hydrated at least every couple days. So if it isn’t raining, or if you have an area that doesn’t get wet such as a covered lanai or front entry, then you must soak the pavers with a water hose every couple days because, remember, the dormant minerals inside the brick cannot come to the surface unless the water vapor breathes them out.
Efflorescence cannot be warrantied because it depends on factors outside of our control. Even paver manufactures do not warranty efflorescence, and they refer to it as a “naturally occurring process.” If efflorescence appears after the pavers have been sealed, we can come back to treat it, but there will be a charge associated with the cleaning. We also cannot guarantee the results of the cleaning, as sometimes the results are less than satisfactory due to the calcified nature of the efflorescence. However, most times, everything goes according to plan!
It’s also possible that even after an efflorescence cleaning and treatment that the efflorescence may return and need to be treated again, in which case there would be a charge for the cleaning. We cannot predict at what point the minerals inside the stone are completely exhausted; therefore, we cannot guarantee that the efflorescence will not return.
Important Things to Know Before Getting Your Pavers Sealed:
Ure-Seal H2O is one of the few sealers that bonds and performs well on brick pavers. Solvent-based acrylic sealers, and many others, do not form a strong enough mechanical bond, which results in premature failure of the coating, commonly referred to as a “whiting issue.” A whiting issue is what happens when the bond between the sealer and the stone – in this case, the paver – starts to fail. The most common reasons these products fail are because of:
- improper surface preparation
- trapped moisture/water vapor
- sealer being applied too thick
- and the most common reason of all: poor quality sealers made with cheap resins
When a whiting issue occurs, there is only one solution: The failing sealer must be stripped from the surface. This can be done without any damage to the stone, however, it requires full vacuum recovery, hot water pressure washing, and a very expensive stripping agent. Because of this, the cost to strip pavers is often triple the cost to seal. We cannot emphasize enough the importance of a high-end product like Ure-Seal H2O being installed by a professional technician.
Ure-Seal H2O is a water-based modified urethane sealer. Since it does not contain any oil-based solvents it is completely environmentally friendly and VOC compliant in all 50 states. Unlike almost every other sealer, it is breathable and allows water vapor to escape. In fact, Ure-Seal H2O is an “all-in-one-day” sealer unlike most products on the market. Ure-Seal H2O is recognized by professional contractors all around the country as one of the best sealers currently on the market.
Important Things to Know After Getting Your Pavers Sealed:
Driving & Walking On It
Generally you will need to stay off of the pavers completely for the rest of the day. Depending on temperature, wind, and sun exposure, the sealer can sometimes take longer to cure.
Areas that are shaded, such as a covered lanai or front entry, can be expected to require a longer drying time.
The best rule of thumb is that if the sealer is still sticky/tacky then it is not ready to be walked on yet. For vehicular traffic, a period of no driving should be observed for a minimum of 48 hours.
Cleaning & Maintenance
In order to maintain warranty on the sealer installation and keep your pavers looking great, we recommend an annual maintenance clean. This is a professional pressure cleaning and mildicide treatment. This cleaning will remove any algae, mold, and mildew that has started to form and the mildicide application will kill any spores/root system of any organic growth. If your paver installation is surrounded by grass or landscaping, we recommend keeping these areas regularly treated to help eliminate weeds, ants, and other pests. Usually if these problems are not maintained in the yard, then they will transfer over the paver installation where they are more difficult to resolve.
If a spill or stain occurs on your sealed pavers it’s best to clean it up as quickly as possible. The fact that the paver is sealed will prevent most substances from causing a permanent stain; however, we cannot guarantee complete stain resistance.
Resealing
We recommend resealing your pavers every 3-5 years. The amount of exposure to sun, rain, traffic, and other such factors will determine the exact lifespan of the sealer. The use of any other sealer other than Ure-Seal H2O will void all warranties and is strongly discouraged. Other products may not be compatible with Ure-Seal H2O and could end up needing to be stripped. Ure-Seal H2O will not need to be stripped before being resealed; we simply clean, re-sand the joints, and then reapply Ure-Seal H2O.
Get the Best Paver Sealing from Peter’s Pressure Washing
Interested in learning more or hiring us for pressure washing Tampa? We’re ready to help. Contact Peter’s Pressure Washing to get started.
Simply call us at 813-455-3670 or click the button below to contact us online.
![]()
Paver Sealing: The Essential E-Book | Peter’s Pressure Washing – Tampa Bay, FL

